Pumpkin-topped Beany Bake a.k.a. Halloweenish Shepherd’s Pie

28 October 2022

Here in the northern hemisphere we’re moving into the “darker half” of the year with the nights growing longer and the mercury dropping rapidly. Halloween is just around the corner so it’s that pumpkin time once again. Here at KCC we’re always looking cut down food waste so this year we’ve got another idea of how to use up your excess squash – a vegan variant on Shepherd’s pie.

Pumpkin-topped Beany Bake a.k.a. Halloweenish Shepherd’s Pie

Halloween has its origins in the Celtic pagan festival of Samhain that marked the end of the harvest period and the onset on the dark months of winter. It was an excuse for a wild party with feasting and drinking at a time when the boundary between our world and the spiritual world was held to be at its thinnest. 

Halloween, which is the evening before All Saints’ Day, 1 November, in the Christian calendar, is still the time when many remember the souls of the dead. Many Halloween traditions in North America were influenced by Irish and Scottish immigrants, harking back to the festival’s pagan roots.

The pumpkin, the round, oversized orange vegetable, native to the New World, has become a symbol of the festival. This has led to millions of pumpkins going to waste so here’s a reminder of some more of our pumpkin recipes to try and reduce the scale of this problem.

Ingredients (serves four)

  • 500 g pumpkin
  • One medium onion
  • One stick of celery
  • One medium carrot
  • One medium green pepper
  • One medium courgette
  • Two medium tomatoes
  • One tablespoon tomato paste (or Turkish hot pepper paste if you can find it)
  • 300 g cooked beans (cannellini or kidney beans 0r a mix of the two)
  • 75 g red lentils
  • 200 ml  vegetable stock
  • 50 ml olive oil
  • One teaspoon chilli flakes
  • One teaspoon turmeric 

Method

  • Clean the pumpkin by removing the hard outer skin and the seeds (if there are any) and then chop into small cubes, put into a baking dish and drizzle with olive oil and mix well. Roast in a pre-heated oven at 180 c for 30 minutes, stirring occasionally.
  • While the pumpkin is roasting, heat the oil in a heavy-based pan and then cook the finely chopped onion over a medium heat for five minutes.  Add the diced celery, green pepper and carrots and cook for another five minutes.
  • Mix in the cooked beans, vegetable stock and tomato paste, chilli flakes and turmeric and stir well. When it boils, add the lentils, stir and then cook for 20 minutes or so until all the liquid is absorbed. While this is cooking, top and tail the courgettes and cut into 1cm thick rounds. Thinly slice the tomato.
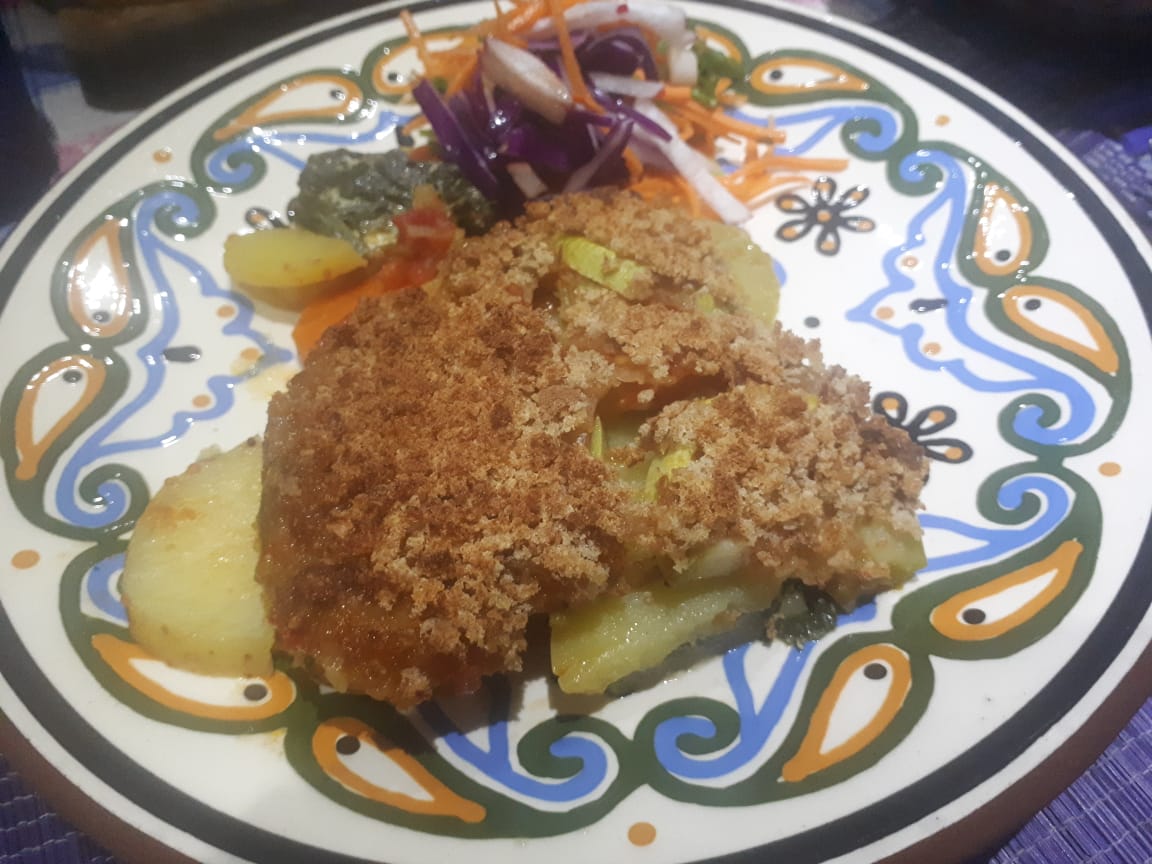
  • Remove the pumpkin and mash with a fork or a potato masher. Put the bean mixture into the bottom of the baking dish and cover with courgette rounds. Cover the courgette with tomato slices and then pack the mashed pumpkin on top of the tomatoes. Decorate with pumpkin seeds and bake at 180 c for 30 minutes or until the top of the pie begins to char.


Advertisement

Chocolate Chilli Chana

3 February 2022

This time round on KCC we’re going for a chickpea, aka chana, chilli that includes a slab of dark chocolate to balance out the acidity of the tomato sauce – a combination that works surprisingly well.

Chocolate chilli chana

We first came across the dark chocolate infused mole sauce many years ago in a Mexican restaurant in Barcelona. It’s been on the list of things to cook for a while and having received a selection of Green and Black’s chocolate that included an 85% cocoa bean bar there were no longer any excuses not to try it out.

We served our chickpea chilli with some pearl barley – it’s also good with brown rice, couscous, bulgur wheat or some flatbread to mop up the chocolate rich sauce. We also recommend washing it down with a margarita or two.

Ingredients (makes 3-4 servings)

  • 300 g chickpeas (cooked)
  • 150 g carrot
  • 150 g onion
  • 50 g red lentils
  • 250 g tomatoes
  • 20 g dark chocolate
  • 25 ml olive oil
  • 150 ml aquafaba (chick pea cooking water)
  • 1 teaspoon cumin seeds 
  • 1 teaspoon coriander seeds
  • 1 teaspoon paprika (smoked if you can get it)
  • 1 teaspoon chilli powder (or chilli flakes)
  • 2 cm cinnamon stick
  • 5 cloves
  • 1 bunch fresh coriander

Method (Cooking time approx 45 minutes)

  • Heat the olive oil in a heavy-based pan and add the cumin seeds. When the seeds start to pop add the diced onion. Stir fry for five minutes over a medium heat and then add the diced carrots. Cook for five more minutes and then reduce to a low heat. Add the chopped tomatoes and cook for another five minutes.
  • Add the aquafaba, ground coriander seeds,  cinnamon, cloves, paprika and chilli powder and stir well. When the mix starts to bubble, stir in the red lentils. Simmer the mixture and after 15 minutes add the cooked chick peas. Cook for another 10 minutes over a low heat and then add the dark chocolate. 
  • Serve with pearl barley or a grain of your choice and garnish the Chocolate Chilli Chana with fresh coriander. Take a slug of margarita and enjoy! 

Lentily Lecho Laghman

21 October 2021

Greetings from Tashkent, Uzbekistan where KCC has been based for the last three weeks on a foodie fact finding mission. Uzbekistan is the land of plov, but is also home to a wide range of pasta dishes such as manti (dumplings), laghman noodles and many cousins of ravioli.

The autumn pickling and preserving season is in full swing with vegetables such as peppers, tomatoes and aubergines cheap and abundant. Our friend gave us a jar of her homemade lecho, a pepper, tomato and onion stew, with herbs and spices added according to your taste. Lecho originated in eastern Europe, so you should be able to track down a jar in your local Polish shop.

We decided to cook up this lecho with some courgettes and protein-rich red lentils to make a tasty laghman noodle sauce. One of the advantages of being in Central Asia is the ready availability of fresh, hand-pulled noodles in the shops, but if you don’t have access to laghman noodles where you are, then try making your own. Check out this laghman recipe here – it’s a bit time consuming but rewarding!

Ingredients (makes 3-4 servings)

  • 125 g fresh noodles per person
  • 2 small courgettes
  • 1 large red onion
  • 100 g red lentils
  • 250 g lecho
  • 50 ml olive oil
  • One teaspoon cumin seeds
  • One teaspoon red chilli flakes

Method

  • Wash the lentils until the water goes clear and then soak for around 30 minutes. While the lentils are soaking, fry the thinly sliced onion in the olive oil and add the cumin seeds. Cook over a medium heat for ten minutes and then add the courgette that has been grated or cut into 1 mm thick,  5 mm long slices. Cook for ten more minutes over a low heat.
  • Take the red peppers from the lecho and cut into thin slices and add to the pan with the onion and courgette mix. Cook for another ten minutes over a low heat and then drain the lentils and add to the pan along with the red chilli flakes and the liquid from the lecho. Cook until the liquid has been absorbed and the lentils are chewy not mushy.
  • Bring a pan of salted water to the boil and then turn off the heat and put the noodles in for a few minutes, Drain and then add the noodles to the sauce and stir well. Serve straight away with a flat bread of your choice.

Modern Day Plovers

17 June 2021

This time round on KCC we’re turning our attention to plov — Central Asia’s favourite rice dish. There are no hard and fast rules for plov, with regional variations prizing different ingredients and each family having its own take on what should go into the dish. One thing is for sure — this spicy rice, carrot, onion, garlic and dried fruit concoction makes for a great centrepiece for any party and is perfect for sharing with family and friends.

KCC travelled up to Kazakhstan’s capital Nur-Sultan to visit a modern day plov-meister who has perfected a tasty, meat-free take on this classic Uzbek dish. Our plov-meister learnt his trade on the mean streets of Hojeli, Karakalpakstan and in the student dorms of Tashkent, Uzbekistan.

Keeping the vampires at bay…

There are no strict cooking times for this recipe — it’s more of a feeling than an exercise in clock watching. Apart from the holy trinity of onion, carrot and rice, our plov-meister deploys whatever is to hand in the kitchen, adding dried fruits and spices along with a surfeit of garlic. For best results, your plov should be cooked in a kazan, a cast iron cauldron, but a deep, heavy-based saucepan or a casserole dish will suffice at a pinch. The pan should retain the heat to enable the plov to cook slowly and for the myriad flavours to meld.

Serve the plov alongside a spicy achik chuchuk tomato and onion salad, steaming bowls of green tea and Uzbek bread, non, click here for a recipe from Caroline Eden’s excellent Central Asian focussed cookbook Red Sands.

Ingredients (makes enough for 8-10 servings)

  • 100 ml cooking oil (For the authentic Uzbek taste track down some cottonseed oil, but failing that sunflower, rapeseed or olive oil works just as well)
  • 500 g onion
  • 500 g carrot
  • 500 g short grain rice
  • 6 heads of garlic
  • 150 g currants /raisins /sultanas – or a mix of all three
  • 100 g dried apricots (with stones)
  • 1 teaspoon cumin seeds
  • 1 teaspoon black peppercorns
  • 1 teaspoon coriander seeds

For the salad:

  • 250 g tomatoes
  • 250 g onion
  • One teaspoon dried basil
  • 1 – 3 Chilli peppers, finely sliced (adjust as to how hot you like your food)

Method

  • Heat the oil over a low heat in a heavy-based pan and then add the sliced onion. Fry the onion until it gets a golden-brownish colour so that later the rice will get its distinctive orangey colour. Cut the carrots into 5 cm long slices, a few millimetres wide and then add to the onions. Cook until the carrots are very tender so that they can easily be cut by a spatula or a wooden spoon while stirring. 
  • Now add the spices, the whole dried apricots, currants, sultanas or raisins (or all three) and whole heads of garlic. Cook for a few minutes to allow these ingredients to absorb the oil and the carrot/onion juice.
  • Rinse the rice carefully until the water runs clear and then put the washed rice on top of the spicy, fruity vegetable base and then pour water over the top through a fish slice to allow an even distribution of the liquid.
  • Cover the rice with an extra 1 cm of water and then cook over a high heat and  when the water disappears from the top of the rice, turn it down to a very low heat, close the lid and allow it to steam for about 20 minutes.
  • Serve with a spicy tomato and onion salad — achik chuchuk — a salad made from thinly sliced tomato and onion, a sprinkling of dried basil and diced chilli peppers, according to how hot you like it, and oven-fresh non bread.

Khorovats – Armenia’s Grilled Veg Star

27 May 2021

With the barbecue season in full swing, we’ve been sent this photo from a reader in Uzbekistan that reminded us that a while back we promised a recipe for Armenia’s favourite warm vegetable salad — khoravats, made from grilled aubergines, peppers and tomatoes.

Grilled veggies ready to be turned into khorovats

Khoravats is a fixture on the menu in many post-Soviet countries — it’s name comes from the Armenian verb khorovel, which simply means to grill. With an abundance of seasonal vegetables appearing in the markets and sunny days and long evenings (in Kazakhstan at least!), it’s time to fire up your grill and get making some khoravats.

Ingredients

  • 2 medium sized aubergines (eggplants)
  • 3 medium-sized green peppers (bell peppers)
  • 3 medium-sized tomatoes
  • 1 small onion
  • 1 bunch parsley or coriander (cilantro)
  • 25 ml olive oil
  • Juice of one lemon

Method

  • Wash the vegetables and prick the aubergines with a fork in a few places (to stop them exploding!). Grill the vegetables until the skins start to char, then keep turning so that the whole vegetable is cooked evenly. The tomatoes will cook first, then the aubergines and peppers. Remove from the grill and put in a paper bag to cool down — this will make it easier to peel the vegetables.
  • After 15 minutes or so, remove from the bag and peel. Then chop into chunks and mix together in a big bowl. Dress the chunks with the olive oil and lemon juice and season with black pepper and then add the finely chopped onion, parsley or coriander (cilantro) and serve with flat bread warmed up on the grill.

The Path to Perfect Pizza

26 November 2020

With much of 2020 spent at home there has been plenty of time this year to hone our baking skills here at KCC. Over the past few months we have been experimenting with the base for an old favourite, pide (Turkey’s take on the baked dough and cheese combo), with an eye to creating a perfect pizza base that is soft and springy but with a crispy crust and we’re well pleased with our latest efforts.

After testing bases made from plain wheat flour, wholemeal flour or rye flour but found that these resulted in a denser base so we tried a more finely-milled flour, similar to Italy’s 00 standard, and found that this gave the best results with a fluffy but crispy base.

With tomato supplies running low (and being too lazy to brave the icy conditions outside), we improvised with crushed avocado in place of tomato sauce and hit upon a winning combination. Add some melty mozzarella, chunks of artichoke and slices of tomato to complete the taste sensation!

Ingredients (makes an eight-slice, 30 cm pizza)

  • 150 g pizza flour (00 grade) 
  • 30 ml olive oil
  • Dried yeast (use according to pack instructions)
  • 75 ml water

Toppings

  • One avocado
  • One medium tomato
  • Artichoke hearts
  • 150 g mozzarella 
  • One teaspoon dried mixed herbs (of your choice)

Method

  • Sieve the flour into a large mixing bowl and add the olive oil and mix with a wooden spoon. Add the dried yeast (according to the instructions on the pack) and then slowly add the water, mixing all the while.
  • Use your hands to form the dough into a ball and knead gently for ten minutes or so. Leave to rise in a warm place in an oiled bowl with a damp tea towel over the top for an hour or so.  After 30 minutes, turn the oven on and heat to 200 c. 
  • Roll the dough into a 30 cm round on a lightly-floured surface and then spread crushed avocado over the base. Arrange strips of mozzarella on top of the avocado. Put tomato slices on top of this and then add chunks of artichoke. Sprinkle with mixed herbs if using.
  • Bake the pizza on the top shelf of the oven for 10 – 15 minutes or until the cheese starts to bubble and brown and the edges of the crust turn a golden brown colour.

KCC’s October Squashfest

1 October 2020

With the temperatures tumbling in the second half of September, thoughts turned to the opening of the pumpkin season, which traditionally starts on 1 October in the world of Knidos Cookery Club.

There’s a definite chill in the air and we’ve even got the heating coming on two weeks ahead of schedule here in Almaty, Kazakhstan. So, it’s certainly time for some autumn comfort food.

We’ve combined the first butternut squash of the season with the summer’s last stand of courgettes and tomatoes and some minty halloumi cheese to come up with a roast that conjures up the pale green, orange and red hues of the falling leaves synonymous with this time of year.

Ingredients (serves 3-4 people)

  • 300 g Butternut squash 
  • 300 g Courgettes (Zuchinni)
  • Three plum (Roma) tomatoes
  • 200 g halloumi
  • One teaspoon cumin seeds
  • 50 ml olive oil

Method

  • Cut the butternut squash into 2 cm cubes – you can peel the butternut or leave the skin on if you wish. Cut the courgette into 1 cm slices and cut in half to make semi-circles.
  • Put them in an ovenproof dish, sprinkle the cumin seeds and pour the olive oil over the vegetables and mix well. Cover the dish with tin foil and cook in the oven at 150 c for one hour. Give the veggies a stir after 30 minutes
  • Remove the foil and stir well. Add the tomatoes, sliced into six wedges and the halloumi, cut into 2 cm cubes. Place these on top of the squash and courgettes and bake at 150 c for another 30 minutes or until the cheese starts to look charred.
  • Serve with a flat bread such as pita or chapati. You can bake some jacket potatoes in the oven with the roast veggies to make the meal more substantial or serve with pasta, rice, bulgur wheat or pearl barley.

String Hoppers à la Qazaq

9 July 2020

With no end in sight to the COVID-19 pandemic – infections continue to rise steadily here in Kazakhstan, averaging around 1500 new cases a day over the last week – it’s time for some more culinary escapism. We’re transporting our taste buds to Sri Lanka for our take on string hoppers, a super tasty noodle, dhal and chutney combo.

SAMSUNG CSC
String Hoppers à la Qazaq with mung bean dhal and coconut and carrot sambol

It’s usually served for breakfast on the island, but in our opinion it also works really well as a main meal. Our version features some locally sourced kespe, or noodles, as we couldn’t find red rice noodles in our local supermarket (!) and a dhal made with mung beans –  check out KCC’s dhal recipe here (simply replace the red lentils and pumpkin with 200 g mung beans – soak the beans for 3 – 4 hours before cooking).

The sambol, a quick and easy chutney, is an essential part of the string hopper experience. It saves on waste, as you can use the dried coconut left over from making the coconut milk for the dhal – click here for our coconut milk recipe.

Carrot and Coconut Sambol

Ingredients (serves 3-4)

  • 50 g desiccated (dried) coconut
  • 150 g carrot
  • One small onion
  • One small tomato
  • One fresh green chilli
  • One lemon

Method

  • Grate the tomato and mix with the finely chopped onion in a large bowl. Add the dried coconut and the juice of the lemon and then add the grated carrot and combine all the ingredients together. Gradually add the finely chopped green chilli, tasting every now and then until you reach your chilli heat tolerance levels.
  • Serve alongside the mung bean dhal mentioned above and with noodles or spaghetti — use about 75 g of dried pasta per person, cooked according to the instructions on the pack.

Falafel to the Fore

18 June 2020

This time round on Knidos Cookery Club we’ll be taking an armchair culinary tour to the Middle East and looking at the origins of the humble falafel. Arguments abound as to where this street snack par excellence originated, but most likely it was Egypt according to the evidence.

SAMSUNG CSC
Millet falafel, anyone?

The Egyptian version of this tasty bite is usually made with fava beans, known as fūl in Arabic, which is thought to be the base for the name falafel , whilst in other parts of the Mediterranean region chickpeas are preferred.

SAMSUNG CSC
Falafel salad

With both chickpeas and fava beans in short supply in Almaty at the moment, it was back to the drawing board to look for an alternative base for our falafel. While stocking up during lockdown in our local shop we came across a pack of millet and a spot of googling revealed that this would work just fine as the base for our take on the falafel.

SAMSUNG CSC
Forming the falafel

We baked them in the oven rather than deep-fried them as it’s a lot less hassle. Be sure to use plenty of parsley, cumin, coriander and chilli powder to spice up the millet. The resulting falafel were crisp on the outside but soft and fluffy in the centre, just as they should be.

SAMSUNG CSC
Bake the falafel in the oven

Be careful when cooking millet as it has a tendency to stick to the pan if you don’t keep an eye on it and stir regularly. We found it best to rinse and soak it for a few hours before cooking as this reduces the time needed to cook it.

Ingredients (makes 12-16 falafel)

  • 150 g millet
  • 300 ml water or vegetable stock
  • one garlic clove
  • one bunch of parsley
  • one teaspoon cumin
  • one teaspoon coriander
  • one teaspoon chilli powder
  • Sesame seeds to coat the falafel

Method

  • Rinse and then soak the millet in a pan for four hours. Drain the millet and cover with water or vegetable stock. Bring to a boil and then simmer until the liquid is absorbed. Stir regularly as the millet will stick to the bottom of the pan if not watched carefully.
  • Finely chop the parsley, both leaves and stalks, mince the garlic clove and add to the cooked millet. Add the spices – if you want to give your falafel more oomph, double the amount. Mix well and then form into balls. Roll the balls in the sesame seeds and then place on a tray and oven bake for 20 minutes at 200 c, or until the falafel turn a golden-brown colour.
  • Serve in pita bread with salad and sauces of your choice or as part of a salad – we made one from cucumber, tomato, spring onion, celery, red cabbage and radish. These falafel will keep in the fridge for a few days so you can cook a large batch at the same time.

The Life of Briam

21 May 2020

There were signs this week of life slowly beginning to return to some sort of normal.  Cafes and terraces are set to open once again in Almaty from next week and the streets are busier. We’re not planning on changing too much at the moment and, in the meantime, we’re content to continue our armchair culinary travels.

20200520_184214
Half-way there – assembling the briam…

Greece has been in the headlines this week with the news that its beaches are reopening and it’s preparing to open its borders to tourists next month. This news brought back memories of holidays in the Greek islands and the great food in the tavernas. One of our favourite dishes is briam (pronounced bree-AM) – a delicious stew of oven-roasted seasonal vegetables.

IMG-20200521-WA0012
Briam – good enough to eat

As usual, we’ve taken a few liberties with the recipe, omitting aubergines (usually a key ingredient) as they are not quite in season in Almaty yet, so foodie purists please look away. We’ve added carrot and spinach to the usual potatoes and courgettes and then cooked it slowly in a tomato sauce. We’ve also topped it with some breadcrumbs to enclose our briam.

Screen Shot 2020-05-21 at 12.15.00

The name briam has an interesting history – it is a borrowed word – there is no letter ‘b’ in the Greek alphabet, instead this sound is represented by combining the letters ‘μ’ (m) and ‘π’ (p) – ‘μπ’. Many Greeks call this casserole tourlou tourlou (all mixed-up), so briam could have come from Greeks who lived in Anatolia until the mass population exchanges in the early 20th century.

20200520_211656
Briam and salad


In the Ottoman era, there was a word biryan, spelt büryan in modern Turkish, which refers to a side of lamb cooked slowly over charcoal in a pit in the ground – a speciality of Siirt in the Kurdish area on the borders with Iraq and Syria. This in turn could come from Persian, where biryan means roasted (notice the similarity with India’s biriyani). Whatever the name’s origin, it tastes great!

Ingredients (serves 4)

For the bake:

  • Two courgettes (approx 300 g)
  • Four potatoes (approx 300 g)
  • One carrot (approx 100 g)
  • 200 g spinach
  • 75 g breadcrumbs

For the tomato sauce:

  • One red onion
  • 250 g tomatoes
  • One bunch of parsley
  • 20 capers
  • 25 ml olive oil
  • One teaspoon mustard seeds
  • 250 ml vegetable stock or water

Method

  1. Make the tomato sauce first. Heat the oil in a heavy based pan, add the mustard seeds and when they start to pop add the chopped onions and cook over a medium heat, stirring occasionally. After five minutes reduce the heat and add the chopped tomatoes. Stir and simmer for ten minutes then add the stock, chopped parsley and capers. Cook until the liquid has reduced by half.
  2. Cook the spinach for a few minutes until it is beginning to wilt and then set aside. Cut the potato, courgette and carrot into 1 mm slices and put a layer of potatoes, then courgettes and then carrots into a greased baking dish. Add the spinach and pour half the tomato sauce over the vegetables. Add another layer of potatoes and courgettes and then pour the remainder of the tomato sauce over the layers. Spread the breadcrumbs over the top.
  3. Cover with tin foil and bake in an oven at 180 c for around 1.5 hours. After an hour, remove the foil and cook for another 20-30 minutes until the breadcrumbs go start to go a golden brown colour. Keep an eye on it to make sure the breadcrumbs aren’t burning. Serve immediately with a fresh salad – it’s also great when it’s cooled down a bit.